Tras Jake the dog y Lumpy Space Princess, ¡necesitábamos un Finn! Así que improvisé uno siguiendo el patrón de Jake the dog.
Para la mochila use este patrón de Aurelia Delaney.
¡Y aquí están todos!
Más fotos en Flickr.
viernes, 21 de septiembre de 2012
lunes, 17 de septiembre de 2012
Lumpy Space Princess
Todavía con Adventure Time, una amiga me pidió si podría hacer una 
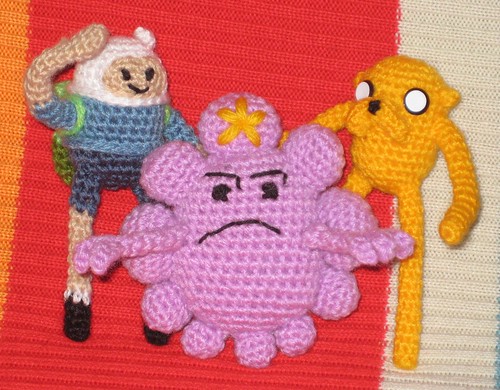
Lumpy Space Princess. Busqué un poco y encontré algunas a la venta, pero ningún patrón. No estoy acostumbrada a hacer mis propios patrones, pero decidí intentarlo y aquí está el resultado.
Está lejos de ser perfecta, pero aún así, es divertida.
Les dejo el patrón, por si les interesa (en inglés porque soy un desastre escribiendo patrones en español...)
I made 4 different sizes of lumps, and arranged them as showed in the picture above.
(Sc single crochet, Inc increase, Dec decrease, Sl slip stitch)
Size A lump (make 3)
Round 1: 6 Sc in magic ring (6)
Round 2: Inc x6 (12)
Round 3: *Inc, Sc* x6 (18)
Round 4: *Sc, Inc, Sc* x6 (24)
Round 5: Sc around (24)
Round 6: *Sc, Dec, Sc* x6 (18)
Round 7: *Dec, Sc* x6 (12) F/O
Size B lump (make 2)
Round 1: 6 Sc in magic ring (6)
Round 2: Inc x6 (12)
Round 3: *Inc, Sc* x6 (18)
Round 4: Sc around (18)
Round 5: *Dec, Sc* x6 (12)
Round 6: Sc around (12) F/O
Size C lump (make 2)
Round 1: 6 Sc in magic ring (6)
Round 2: Inc x6 (12)
Round 3-4: Sc around (12)
Round 5: *Sc, Dec, Sc* x3 (9) F/O
Size D lump (make 3)
Round 1: 6 Sc in magic ring (6)
Round 2: *Inc, Sc* x3 (9)
Round 3: Sc around (9)
Round 4: *Dec, Sc* x3 (6) F/O
Body
Round 1: 12 Sc in magic ring (12) Don't worry about closing this one, you'll sew one lump over it.
Round 2: Inc, Sc x4, Inc x2, Sc x4, Inc (16)
Round 3: Inc x2, Sc x4, Inc x4, Sc x4, Inc x2 (24)
Round 4: Inc x2, Sc x8, Inc x4, Sc x8, Inc x2 (32)
Round 5-15: Sc around (32)
Round 16: Dec x2, Sc x8, Dec x4, Sc x8, Dec x2 (24)
Round 17: Dec x2, Sc x4, Dec x4, Sc x4, Dec x2 (16) You may start stuffing now.
Round 18: Dec, Sc x4, Dec x2, Sc x4, Dec (12)
Round 19: Dec x6 (12) F/O
Arms (make 2)
Leave a tail in the beginning to sew the arm to the body.
Round 1: 4 Sc in magic ring (4)
Round 2-8: Sc around (4) Continue with fingers:
Ch 4, crochet back along the chain, 1 Sl in second Ch from hook, Inc, and Sl through both sides of the “wrist”, so it will close. Make a total of 3 fingers. F/O
Now you just have to stuff all the lumps and sew them around. Attach the arms and embroider her face. You may check around for her facial expressions, most of the time she looks really grumpy. She is crowned with a star. I decided to embroider it, but you can use yellow felt or a sequined star.
Más fotos en Flickr.
Etiquetas:
amigurumi,
mis patrones,
patrones gratis
sábado, 15 de septiembre de 2012
Jake The Dog
Hace poco que me he aficionado a "Adventure Time" y sus locos personajes. Encontré este divertido patrón, Jake The Dog free pattern por Samantha Evans en Samigurumi (lo pueden encontrar también en Ravelry) y tenía que probarlo.
Está muy bien escrito y es fácil de seguir. Sólo hay que trabajar un poco los detalles. Usé círculos de plástico en lugar de fieltro para los ojos, y para la nariz un poco de hilo. Para los miembros hice vueltas de 6 puntos porque no puedo trabajar vueltas de 4 puntos, y eran lo suficientemente ajustadas.
Estoy muy contenta con el resultado, así que ¡gracias, Samantha!
Más fotos en Flickr.
jueves, 13 de septiembre de 2012
Angry Birds!
Después de un tiempo largo lejos de la aguja, y un par de proyectos fallidos, aquí está mi último trabajo: The Angry Birds!
Los patrones de Adorable Amigurumi se consiguen gratis a través de Ravelry. Son claros y precisos, están muy bien escritos y es muy fácil seguirlos.
Usé ojos más grandes que los indicados, así que hice una vuelta extra para el blanco (8-16-24). No tenía fieltro en casa, así que hice unos pequeños semicírculos (3-6-9) para los pájaros azul y negro, y pequeños círculos negros para la nariz y orejas del cerdito.
Más fotos en Flickr.
jueves, 6 de septiembre de 2012
Suscribirse a:
Comentarios (Atom)


